Adagio Water Features FAQ | Installation, Maintenance & Troubleshooting
- Where do I place my outlet for my wall water feature?
- What hardware do I need to install my water fountain?
- I cannot find my installation instructions. Where can I get another copy?
- My slate is very thick/thin. How do I install the water distribution unit?
- How do I position the pump in my tray?
- My pump is making a loud noise, how do I fix that?
- What kind of water should I use in my water feature?
- How do I fill my water fountain?
- How often will I need to fill my water fountain?
- There is water splashing from my water feature, how do I fix this?
- My lights are not working on my water feature, but the waterfall is working.
- When I turn on my water feature, only the lights come on, the pump does not.
- Neither my lights nor my pump will turn on my water feature.
- The water on my glass/mirror water feature runs in a “V” shape. How do I get it to run to the edges?
- My water surface has dry spots on it. How do I fix that?
- My tray is leaking from the corner.
- How do I clean my water feature?
- There is algae growing in my tray. How do I prevent this?
- My light bulbs have burned out. How do I replace it?
- How do I use the remote for my color LED lights?
- What is your Warranty Replacement Procedure?
- What is your return policy?
- What is the logo process like?
Where do I place my outlet for my wall water feature?
The water feature runs off of a standard outlet. We recommend if you are placing your outlet behind your water feature that you don’t install a GFI protected outlet. It will be extremely difficult to reset it if it flips.
The outlet can be placed in the center of where you want your water feature. If you have multiple panels for your water feature, you will need to place the outlet in the center of the far-left stone. The water features come with a 90-degree plug, so you will not need to recess your outlet.
For ease of turning the water feature on and off, we recommend wiring the outlet to a light switch. This makes it easier to control if it is placed higher than what is easy to reach.
What hardware do I need to install my water fountain?
Each water feature ships with all the hardware needed to install it on a wood-studded sheetrock wall. If you have a metal studded, stone, or tile wall, you will need to purchase the appropriate screws and anchors for your wall at a hardware store. A new hardware kit can be purcahse by selecting the correct feature from the drop down on this link.
I cannot find my installation instructions. Where can I get another copy?
The installation instructions can be found on our site. Just follow this link.
My slate is very thick/thin. How do I install the water distribution unit?
Each piece of slate is all natural, therefore they vary in thicknesses. The water distribution unit is made of copper, which is very pliable and easy to bend to fit all thicknesses of slate. If your slate is very thin, the tabs that go on the back of the water feature will need to be bent in towards the slate to hold it in place. If your slate is very thick, you will need to bend the back tabs out, slide the water distribution unit on the stone, then bend them back in until they touch. Please review the video under "My water surface has dry spots on it. How do I fix that?" for a demonstration on bending the copper water distribution unit.
How do I position my pump in my tray?
It is important to have the water outlet from your pump go as straight up the back of your water feature as possible. This will improve your water flow to the top.
For larger water features, in order for the tube to go up the back, it is necessary to turn the pump so the filter screen and the edge of the pump make a “V” shape along the back of the tray, as shown in the below picture.
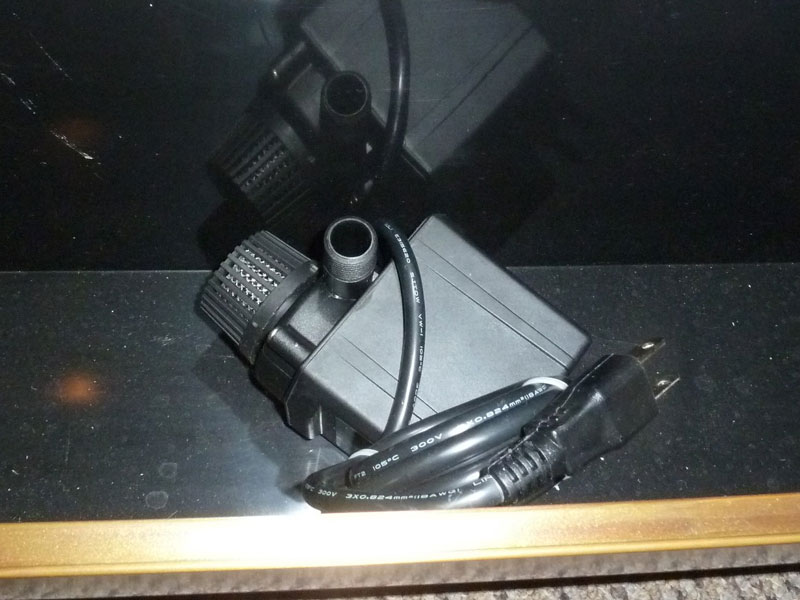
For smaller wall mounted water features, be sure the pump is rotated so the long portion of the rectangle lies flat on the bottom of the tray as the below picture shows:

This will put the spout for the water as close to the back as possible. You may still need to slightly tip the pump in order for the spout to go behind your water surface. Be sure you trimmed the hose about 2” so it is not too long and creates bends in it behind the water surface. The bends will slow down your water flow and may cause dry spots.
This video will show you how to replace the pump in a wall mounted water feature:
For freestanding water features you want to make sure the pump is positioned with the filter parallel to the bottom tray with the hose going into the side upright as straight as possible. Here is an example picture:

My pump is making a loud noise, how do I fix that?
Noisy pumps can be a result of a couple of different things.
1. Be sure your pump is positioned correctly as shown under “How Do I Position My Pump in My Tray?” section above.
2. Be sure your black sponge pump pad was installed on the bottom or back side of your pump. It is important that the pump does not touch the tray since the vibrations from the pump will make the tray shake and create a noise.
3. If the pump pad was installed correctly, try holding the pump in the water so you are sure it is not touching any sides. If the pump is no longer loud, the pump is vibrating on the tray somewhere. Contact Adagio and they will send you extra pump pads at no cost so you can be sure the pump is not touching the bottom or back of the tray.
4. If the pump is still loud, the impeller may be broken or stuck. This is found under the filter screen. Remove the filter screen by twisting it or taking out the screws, depending on the model type. The impeller is a white spinning plastic piece that propels the water from the pump. Check to be sure it is spinning freely and has no broken parts. It may need to be cleaned if it is not spinning freely.
5. The pump should fit in the cut-out notch in the pebble shelf when it is installed. If the pump is touching the sides of the shelf, it will vibrate all the pebbles and make a loud sound. Be sure it is centered in the opening.
6. Make sure your water is kept at the right level. It needs to cover the pump completely, but not go above the fill line inside the tray. If it is low and the pump is taking in air, it will be loud and could burn out your pump.
What kind of water should I use in my water feature?
We strongly recommend you use distilled water in your water feature. This will extend the life of your pump and minimize mineral buildup. Reverse osmosis would be the next best option, but it still contains minerals. Soft water contains salt, which can damage your water feature. If you use water other than distilled water, you will need to clean your water feature more often.
How do I fill my water fountain?
We recommend only using distilled water in your water feature. To fill your water feature, begin by turning it off. If you fill it when it is running, the water in the hose and water distribution unit will overfill the tray when you turn it off. Pour the water directly onto the water surface and let it run down into the tray. There is a fill line on the right side of the tray. Do not fill above this line. If you cannot see the line, be sure to never fill the water feature so you see the water on the pebble shelf. It should be filled no more than ½” below the pebble shelf. If you accidentally over fill your water feature, the tray may appear to leak.
The following video will show you how to fill your water feature.
How often will I need to fill my water fountain?
Water features are a natural humidifier. Moving water will evaporate at a greater speed than standing water. You may need to fill your water feature every other day, depending on which water feature you have, how many hours a day you run it, and how hot and humid your location is. You will want to watch your water level each day for the first couple of weeks you run it to see how quickly it evaporates. This should help you know how frequently to fill it. If your water feature starts having small bubbles coming down, your pump is pulling in air and the tray needs to be filled. If you allow your water feature to run without being properly filled it can result in a shorter pump life or pump burnout. You want to fill it before the air bubbles start to appear.
There is water splashing from my water feature. How do I fix this?
There should not be any water from the water feature getting on your floor, wall, or surrounding area. The following video will show you how to fix any splashing that may occur.
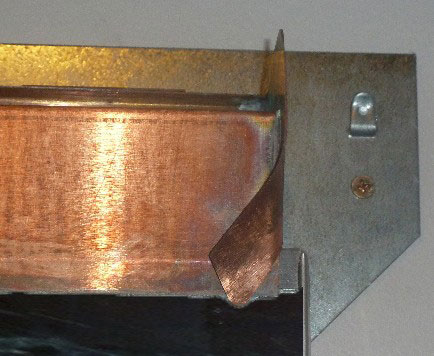
Water streaming from the top sides
If there is water coming off of the top water distribution unit in a stream on the side, you will need to bend the copper tabs on the side until they are flush with the water surface. To do this, first turn off your water feature. Take your thumb and push the bottom end of the copper tab that is on the side of the water feature until you have folded it onto itself and it is touching the water surface. You will be bending it about 90 degrees. This will direct the water back onto your water surface rather than streaming off the sides. The following picture shows what the tabs should look like after they have been bent in.
Water splashing from the stone surface
If there is water splashing off of your stone, you will simply need to turn off your water feature and take a chisel or screwdriver to lightly scrape off the bump that is causing the splashing. Since the stones are all natural, they are not completely flat and sometimes require minimal adjustments to prevent splashing.
Water splashing out of the tray
If your water is splashing in the tray or when it reaches the bottom of your water feature, be sure the pebble shelf is installed correctly. It is designed to have the water flow down behind it into the tray. When the water splashes in the tray, it will hit the bottom of the pebble shelf and stay in the tray. You want to be sure there is about a 1/8-1/4" space between the water surface and the lip on your pebble shelf. This will allow the water to go straight into the tray. You also want to be sure none of the decorative pebbles on your shelf are touching the water surface, which would cause the water to splash off.
My lights are not working on my water feature, but the waterfall is working.
The following video will show you how the light bar is designed to work on wall mounted water features.
Wall Mounted Water Features
1. If none of the lights are working on your water feature, but the pump comes on when you turn it on, there are a couple of things to check. First, most of the water features come with a 4 way pull chain. This is designed to allow you to run just the lights, just the pump, both the lights and the pump, or turn everything off. This chain is located on the left side of your light bar, up under the hood. Try pulling it for different settings to verify which setting it is on.
2. If your water feature does not have a pull chain and dimmer switch, it comes with a rocker switch on the top, center of the water feature. This turns everything on and off.
3. Most of the water features also come with a dimmer switch. This switch is located on the light bar up under the hood, about 1/4 of the way in from the left side. This switch turns to allow you to dim the lights in your water feature. If you turn it all the way, it will turn the lights off. Some of the dimmer switches work like a button, so if you push it in it will turn the lights off. Check the dimmer switch with different settings of the pull chain.
4. You will want to try different light bulbs in your water feature to verify they are working.
5. If your wall mounted water feature has the remote upgrade option, please make sure the cords are connected as shown below:

Freestanding Water Features
1. Check that your cords are plugged into each other as the below pictures shows. The pump will be in the tray, the cord from the lights runs up the right side of the panel, the remote will be outside the liner, in the alcove between the liner and the decorative metal tray cover.

If the pump comes on, but the lights do not and all of the cords are plugged in correctly, try the following:
1. Unplug the light cord from the splitter cord and plug it into an outlet directly.
2. Replace the light bulbs with new ones. The LEDs bulbs that come with the water feature are complimetary only and can occasionally be damaged in shipping and need to be replaced.
When I turn on my water feature, only the lights come on. The pump does not.
Wall Mounted Water Features
1. If there is no sound from the pump when you turn on your water feature, there are a couple of things you can check. First, most of our water features come with a 4 way pull chain. This is designed to allow you to run just the lights, just the pump, both the lights and the pump, or turn everything off. This chain is located on the left side of your light bar, up under the hood. Try pulling it for different settings to verify which setting it is on.
2. If the pump still does not come on, check where you have it plugged in. There is an outlet on the right side of the light bar that the black pump cord should be plugged into. If your water feature is plugged into the wall instead of the light bar, the switch will not run the pump. If you have a water feature with multiple water surfaces, there is a pump for each water surface. Each pump cord should come up behind the water surface on the left side and plug into the light bar in the outlet above each stone. The white cord should come from the right side of the water feature and plug into the wall.
3. If your wall mounted water feature has the remote upgrade option, please make sure the cords are connected as shown below:
Freestanding Water Features
1. Check that your cords are plugged into each other as the below pictures shows. The pump will be in the tray, the cord from the lights runs up the right side of the panel, the remote will be outside the liner, in the alcove between the liner and the decorative metal tray cover.
2. If the cords are all plugged in correctly and the pump will still not come on, you will want to check the pump by plugging it into a different outlet. You may need to run an extension cord to do this. If the pump comes on when plugged into a separate outlet, verify all of your connections are tight in the water feature and plug it in again.
Neither my lights nor my pump will turn on my water feature.
Wall Mounted Water Features
1. Be sure your breaker has not flipped and needs to be reset. We recommend you don’t plug your water feature into a GFI outlet located behind your stone that has the reset button on it. This will make it very difficult to reset if it flips.
2. Most of our water features come with a 4 way pull chain. This is designed to allow you to run just the lights, just the pump, both the lights and the pump, or turn everything off. This chain is located on the left side of your light bar, up under the hood. Try pulling it for different settings to verify which setting it is on.
3. If your wall mounted water feature has the remote upgrade option, please make sure the cords are connected as shown below:
Freestanding Water Features
1. Be sure your breaker has not flipped and needs to be reset. The water feature uses a standard outlet.
2. Check that your cords are plugged into each other as the below pictures shows. The pump will be in the tray, the cord from the lights runs up the right side of the panel, the remote will be outside the liner, in the alcove between the liner and the decorative metal tray cover.
3. Be sure the remote battery is installed. It runs off of radio waves, so you will not need to have direct line of sight for it to work.
4. Try plugging the pump and lights into a different outlet to see if they work. If they do, you may need to replace the battery in your remote.
The water on my glass/mirror water feature runs in a “V” shape. How do I get it to run to the edges?
Glass has minimal surface tension, so untreated, the water will cling to itself and not run evenly on the glass. You will need to add surface tension to the glass in order for the water to run evenly. Included with your water feature was a small grey bottle of mirror prep. There are instructions on how to apply it on the bottle. If you no longer have this bottle, it is available on our website.
The following video will show you how to prepare your glass/mirror for water.
Repeat steps as necessary while focusing on the outside edges or where the water pulls away from the glass the most.
My water surface has dry spots in it. How do I fix that?
Uneven water flow can appear for a few different reasons. The following video shows how to adjust your water feature's flow.
1. Check if the water distribution unit is level
If you have one side that has a lot of water and the other side is dry, the water distribution unit may not be level. You will want to take a level and place it on the copper water distribution unit to verify it is flat. If one side is lower than the other, you can use the small metal shim that came with your water feature or any other thin metal or plastic piece to raise the lower side until it is level.
2. Clean the water distribution unit
It is important that each time you adjust the baffle or anything else with the water distribution unit you clean the copper thoroughly with the supplied scotch-brite pad. These are the same as the scrubbing pads commonly used in kitchens for dishes and can be purchased at many stores. Copper attracts the natural oils from your fingers and will cause it to remain on the water distribution unit. Since water and oil don’t mix, the water will go around the oil locations, causing dry spots in your water surface. You will need to clean the front copper surface and the top lip where the water comes over. Be sure to go all the way over the top lip and down inside the water distribution unit when you scrub it.
If you can see the water bubbling at the top of the water distribution unit when it is running, but the water will not come over in that spot, there is some oil or other debris from the air there that is stopping the water flow. Turn off the water and try scrubbing that area again.
Remember to never use your finger to correct water flow issues. This will only make the problem worse by adding more oil to the copper water distribution unit.
3. Check your baffle
You may need to adjust the baffle. This is a long, white plastic bar that is located inside the copper water distribution unit. To get to the baffle, you will need to remove your hood.The baffle can be removed by flattening the copper tabs that are on the top of it and using those tabs, pull the baffle out of the water distribution unit. It is an “L” shape and is most easily removed by rocking the top towards you, then pulling the bottom out.
There are tabs on the bottom side of the white plastic that are similar to the two on the top. The water comes up from the tray in between these two tabs. These tabs act as a dam to keep the water in the center or allow it to move towards the edges.
If your dry spot is in the center of your water feature, you will need to bend the tabs towards each other to keep more of the water in the center of the water surface.
If you have dry spots on the edges, open the tabs a little so they will allow more water to flow towards the dry area.
Usually, the most ideal setting is to have the bottom edge of the tabs even with the bottom edge of the white plastic. You do not want to make them straight up and down because the copper tabs will be longer than the baffle, which will not allow it to sit properly in the water distribution unit and cause more water flow issues. You may need to try adjusting this a few times to get the water to flow correctly. You can plug your pump into an extension cord if it will not reach an outlet while you are adjusting the water flow.
The following video will demonstrate how to remove the baffle:
Baffle Remove and Replace Video
4. Check for kinks or bends in the hose
If the water distribution unit does not appear to have enough water at the top to cover the surface, there may be a kink in your hose. Use a flashlight to look behind your water surface at the clear hose. This should go straight up the back without any kinks or bends. When the water feature was assembled, the hose should have been trimmed a couple of inches before attaching it to the pump. If this was not done, there may be extra hose that is bending behind the water surface. Also check the pump placement to be sure the spout is going as straight up the back of the water surface as possible.
5. Check the pump
See “How Do I Position My Pump in My Tray?” to see how your pump should be positioned
To verify the pump is working properly, take out the pump and remove the filter screen. This can be done by twisting it or removing the screws, depending on the model. Inside the screen is a white impeller that should spin freely. If the pump has been used for a little while, it may need to be cleaned out. This is more common if you are not using distilled water in your water feature. You can remove the pump from the tray and place it in a bucket of 50/50 vinegar/water solution. Run the pump for about 30 minutes in the bucket to clean out any mineral deposits that are in it.
My water tray is leaking from the corner.
Wall Mounted Water Features
It is very rare to have a wall mounted water feature leak. Occasionally water will get between the plastic liner and the decorative metal tray cover. The decorative metal tray cover is not watertight and will leak out the corner, making it appear to be faulty. This can happen if the tray was overfilled or if it is experiencing any splashing. If the water feature only leaks when it is running, water is getting between the plastic liner and metal tray. The water sits under the liner and the vibrations from the pump shake it out. It takes a long time to evaporate out of that space unless you follow the below procedures.
The following video will show you how to test your tray for leaks.
1. Remove the pebbles and the pebble shelf from the tray.
The following video will demonstrate how to remove the pebble shelf:
2. Empty the water from the tray. This can be done with a shop vacuum or use a cup and bucket to empty most of the water.
3. When the tray is mostly empty, lift up on the corners to remove it from the metal hooks that hold it in place. You will only need to lift it about 1” before it comes free of the hooks. You can then move it towards you slightly and drop it down below the stone.
4. The pump should still be connected to the plastic hose. Remove the hose clamp and slide the hose off the pump. This can be set aside until the leaky tray test is complete.
5. Pour any remaining water out of the tray. Leave it upside down on a table or counter for 24-48 hours to allow all the water that has collected between the metal finish and the plastic liner to drain out.
6. After the tray has sat for 1-2 days, turn it right side up on the table or counter. Fill it with water about 1” from the top. If the tray does not leak while sitting on your counter, it will not leak on your wall.
7. If the tray does not leak while sitting on your counter, it will not leak on your wall. Reinstall your tray by sliding the empty tray up behind the stone until it is high enough to hook on the clips. Reconnect your pump and then fill with water. Reinstall your pebble shelf and add the pebbles. Please review the "There is water splashing from my water feature, how do I fix this?" section to prevent this issue in the future.
8. If it does leak, please send photos of the leaking point with the tray still removed from the wall to Adagio be assessed for repairs or replacement.
Free Standing Water Features
It is unusual for a freestanding water features to leak. If you are experiencing water coming out of the bottom of the tray, you will need to determine if the liner is leaking or if there is water between the liner and the decorative metal tray cover.
1. Empty your tray of water. This is best done by removing the panel from the water feature, then using a shop vacuum or a cup and bucket. When the tray is mostly empty, you can pour the rest of the water out.
2. Remove decorative metal trim tray cover from the liner and set it aside.
3. Let the liner dry upside down for 24 hours.
4. Fill the liner 1" from the top with water.
5. If it starts to leak again, you will need to contact Adagio for a replacement or options for repair.
6. If it doesn't leak, you can reassemble your water feature and review the "There is water splashing from my water feature, how do I fix this?" section to prevent this issue in the future.
How do I clean my water feature?
Your water feature will need to be cleaned out about twice a year if you are using distilled water. If you are using another type of water you will need to clean it more often. The following video will show you how to clean your water feature.
1. Remove your tray. This can be done by removing the pebbles and pebble shelf from the inside of your tray. Empty the water by either using a shop vacuum or cupping it out to a bucket. When it is mostly empty, you will lift up about 1” on the corners of the tray which will release the tray from the metal hooks it hangs on. The tray can then be dropped down behind the stone and removed.
2. Empty any remaining water and wipe out the tray. If you need to use cleaners to remove mineral buildup or algae build up, be sure to thoroughly rinse it out when you are done. You do not want any remaining residue to run over your water surface.
3. If you have a mirror or glass water feature you can clean the surface with a glass cleaner. If there is any mineral buildup, you can use a 50/50 solution of vinegar and glass cleaner. Be sure to remove any remaining residue and reapply the mirror prep when you are finished.
4. If you have a stone or marble water feature you will want to use a stiff nylon brush and scrub your stone. This will remove most mineral buildup. If you have a lot of buildup, you can use a product like CLR to help remove it. Once again, be sure it does not get into the tray and all residue is cleaned off before running the water feature.
5. Wipe down the hood and tray with a soft cloth and glass cleaner.
6. Reassemble your water feature and enjoy!
There is algae growing in my tray. How do I prevent this?
If your water feature is in an area where it receives natural sunlight, some algae may grow in the tray. To prevent this, you can add 1-2 DROPS of bleach every other week to the water in your tray. You do not want to add more than this or you run the risk of bleaching your stone and having the bleach smell linger in the area.
Adagio has not tested any algaecides in our water features so we do not recommend using any.
My light bulb has burned out. How do I replace it?
The bulbs we use in our water features are standard bulbs that can be purchased almost anywhere that sells light bulbs. Soft White GU10 LED bulbs have replaced all halogen bulbs for our water features starting in 2020. If your feature was purchased prior to 2020, please see the list below to determine bulb type:
| PAR 20 Bulbs | GU 10 Bulbs |
|---|---|
|
Cascade Springs
Cottonwood Falls
Deep Creek Falls
Regal Falls
Inspiration Falls
Majestic River
Solitude River
Summit Falls
Sunrise Springs
Teton Falls
|
Calming Waters
Grandeur River
Harmony River
Pacifica Waters
Reflection Creek
Serene Waters
Whispering Creek
Tranquil River
|
How do I use the remote for the color LED lights?
The LED bulbs come with a remote that will allow you to change the colors and settings. The sensor for the bulbs is on the light bulbs themselves. Be sure you have installed the LED bulbs and removed the plastic insulation sheet from covering the battery. The remote will need to point up under the hood, towards the bulbs. You may need to have it almost touching your water surface to control all the lights at once if you have several lights.
If the dimmer switch on the water feature is turned down, the light bar will not have enough energy for the remote to control all the lights. The lights on the right side may not respond to the remote. If this happens, simply turn the dimmer switch on your water feature all the way up.
The following picture shows how the controls work.
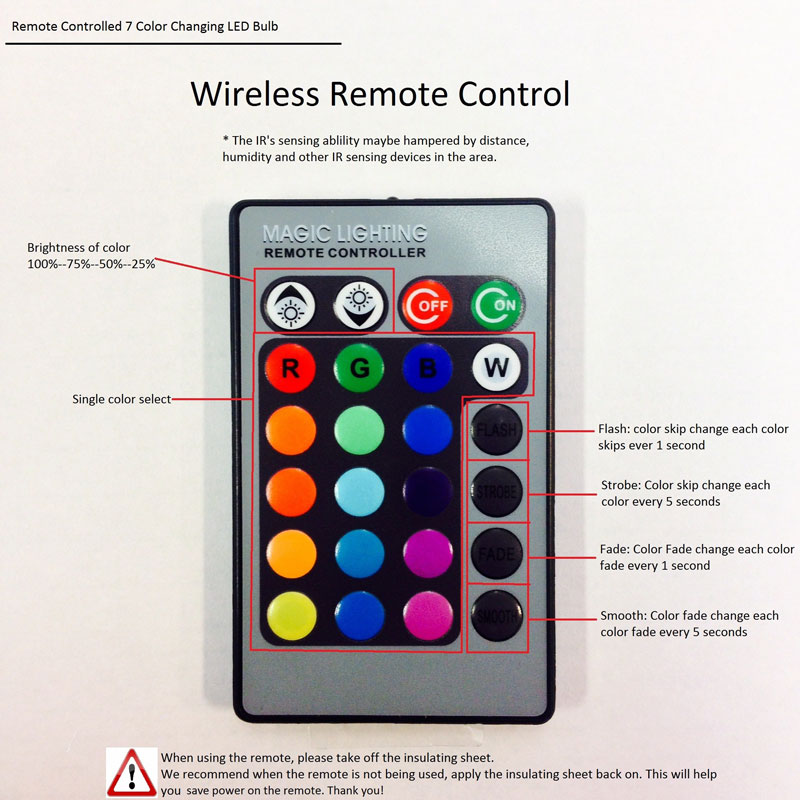
- The top white buttons that have the suns and arrows on them control the brightness. There are four levels, 100%, 75%, 50%, and 25%
- The colored circles allow you to select the colors you would like to use.
- The top black button marked "Flash" skips colors every 1 second
- The second black button marked "Strobe" skips colors every 5 seconds
- The third black button marked "Fade" fades into the new color every 1 second
- The bottom black button marked "Smooth" fades into the new color every 5 seconds
Warranty Replacement Procedure
Our warranty covers manufacturers defects in parts for 1 year and shipping for the first 30 days. If you have a part that has a defect, we are happy to replace it for you. To read our warranty, click here. You will have two options to get your replacement part.
1. You can purchase a new replacement part up front and pay for shipping for the new part to you and the old part back to Adagio. You will be sent out the new part right away, along with instructions on how to replace it. You can use the same packaging the new part was sent in to return the old one. A prepaid label will be included on the shipment for ease of return.
When Adagio receives the old part back, it will be thoroughly tested. If it is deemed defective, a refund will be issued. If you notified Adagio of the defective part within 30 days of receiving your order, a full refund of the part and shipping will be given. If it is outside the 30 days, but within a year, you will receive a full refund of just the replacement part. If it is not found to be defective, no refund will be issued. You will then have the option of paying shipping to get the old part back if you want it.
2. You can remove the defective part from your water feature, carefully box it up using Adagio’s packing standards, and ship it to Adagio. When it is received, we will video the testing of the part. If it is found to be defective, it will be repaired or replaced. If it is not defective, you can pay for the shipping to receive the part back. If we are notified of the defective part within 30 days of your order being delivered, we will send a prepaid label to have the part sent to Adagio and, if the part was defective, pay the shipping for the replacement part to be sent to you. If the part was not defective, you will need to pay for the shipping to Adagio and back to you before the part will be returned.
Return Policy
Each water feature carries a 1-year limited warranty that will replace any defective parts. Due to the difficulty for the consumer in packaging the product, we do not accept returns. We have many help videos and are able to chat, call, and email customers to solve any issues that may arise.
oy-a1so-983382183
Logo Process
What file type works best for my logo?
EPS files are preferred, but we can also work with AI, high-resolution JPGs (2MB+), or PDFs.
How accurate is the color match?
We use Pantone color matching for the closest possible match. Because natural stone varies, colors can appear slightly different once applied.
Do you warranty the paint colors?
Due to variations in stone texture and lighting, we cannot warranty exact color appearance.
What surfaces can the logo be applied to?
Sandblasted logos can be applied to stone, mirror, or glass.
Vinyl logos can be applied only to clear or colored glass.
Can vinyl logos be removed?
Yes. Vinyl logos can be removed or replaced, making them ideal for temporary branding or events.
How long does the logo process take?
Timing varies based on approval speed and production, but most logo orders proceed quickly once artwork is approved.
Can I include multiple emails for logo approval?
Yes. Add any additional emails to the notes section during checkout.
Who handles my logo customization?
Our logo specialist, will guide you through the entire process—artwork, proofs, color selection, and final application.